
Do-Not-Call (DNC) lists are customizable lists of phone numbers, account numbers, and/or unique account number and phone number combinations that indicate to the system that these customers should not be contacted.
U17
DNC Types
LiveVox uses one of the following methods to run the Do-Not-Call list at the time of contacting a number or launching a campaign.
| Legacy DNC (build-time) |
|
| Dial-time DNC (dial-time) |
|
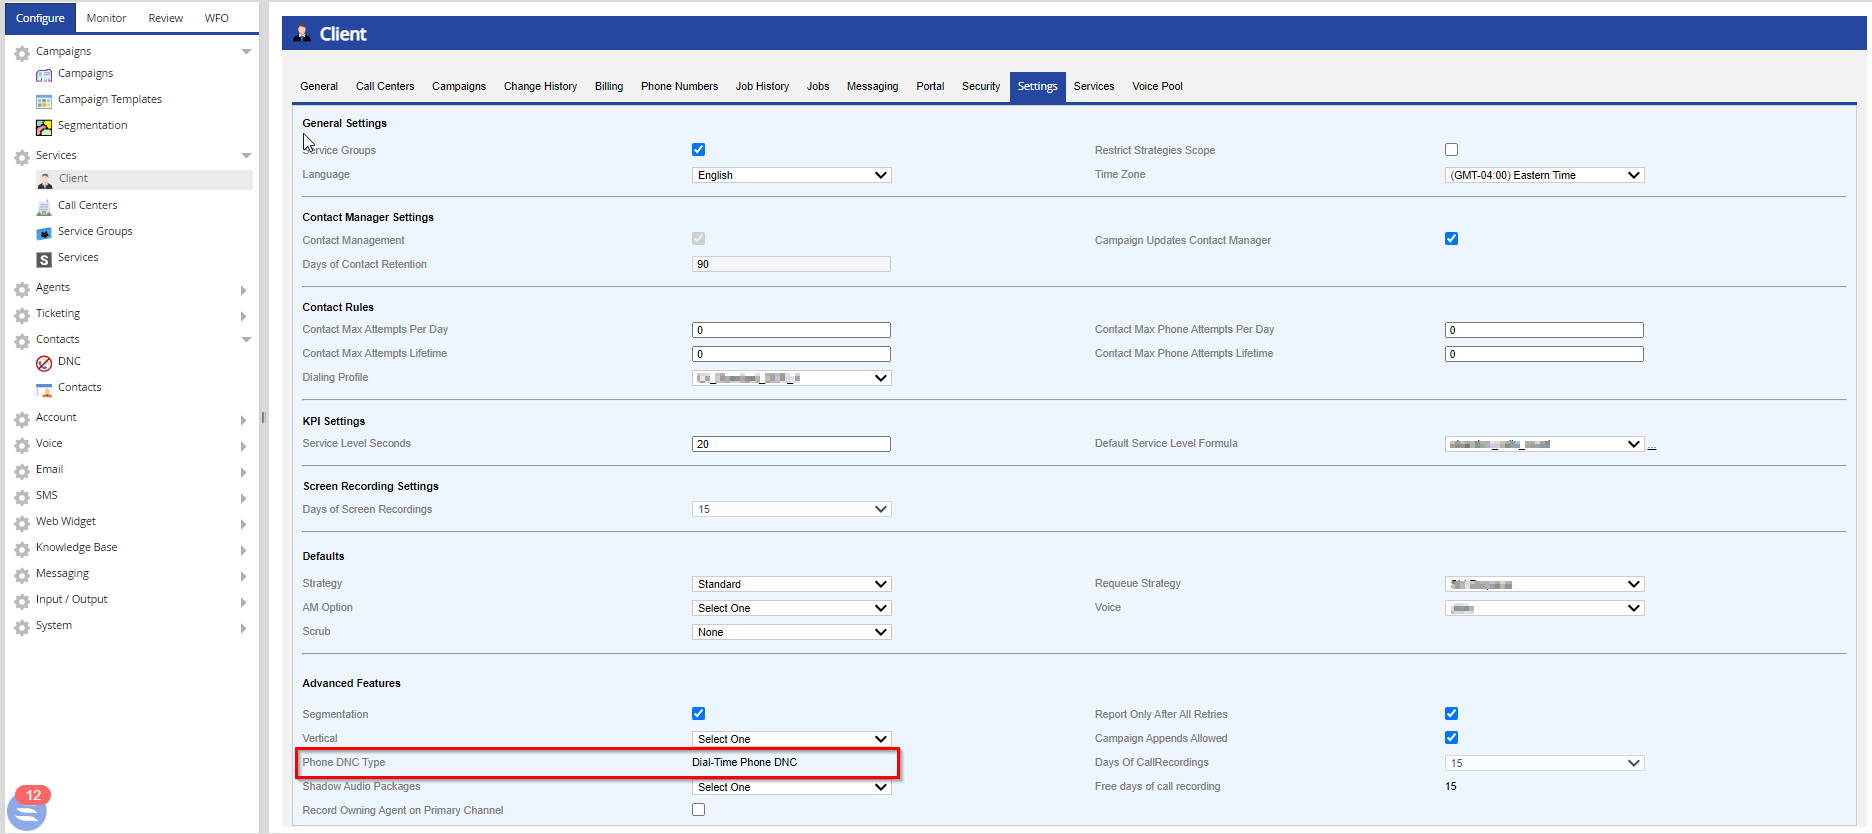
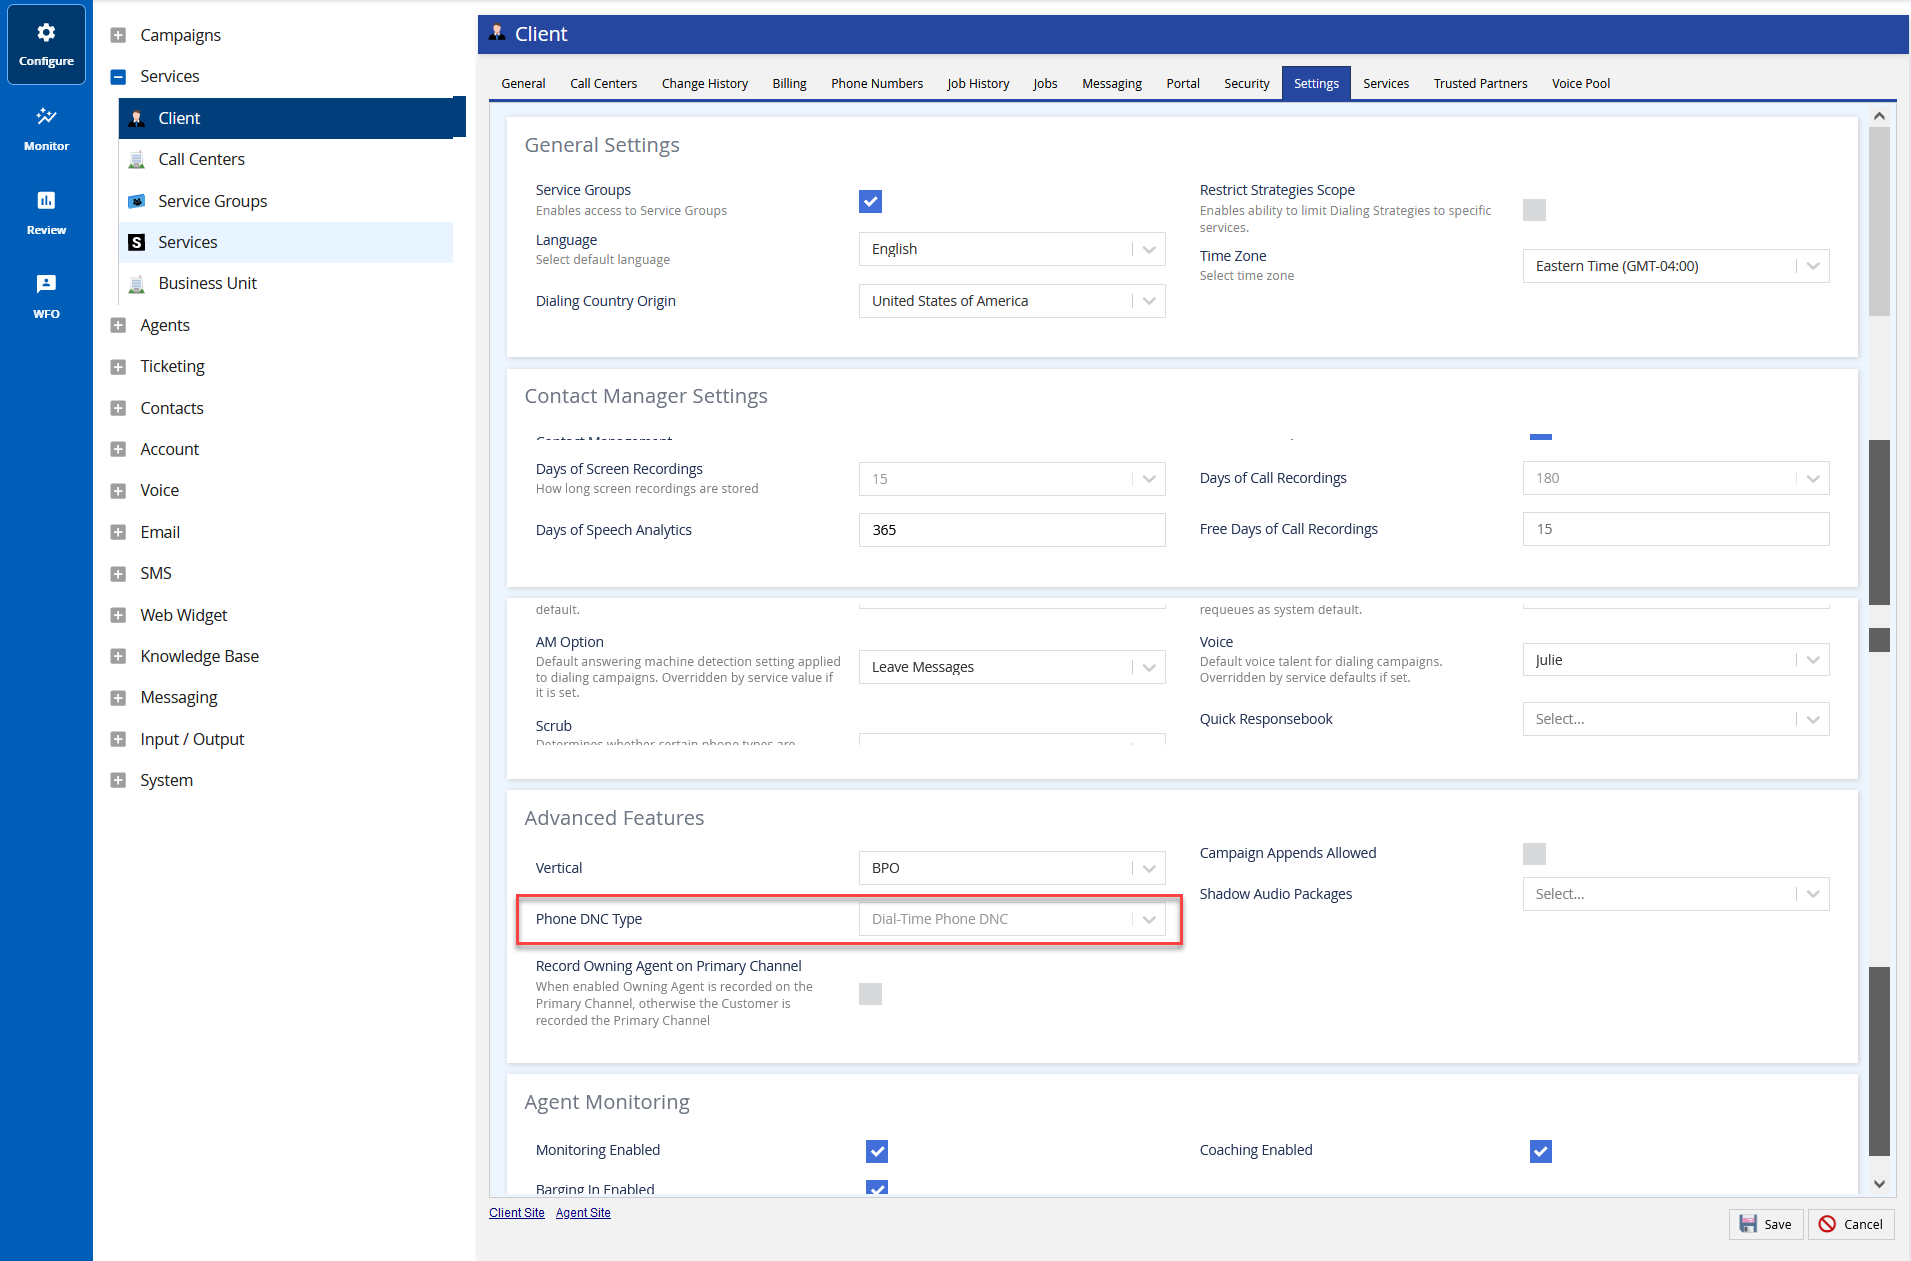
Verifying the Type of DNC for your Portal
To verify the type of DNC option that is enabled for your portal, on the Configure tab of the LiveVox Portal, click Service > Client > Settings > Advanced Features.
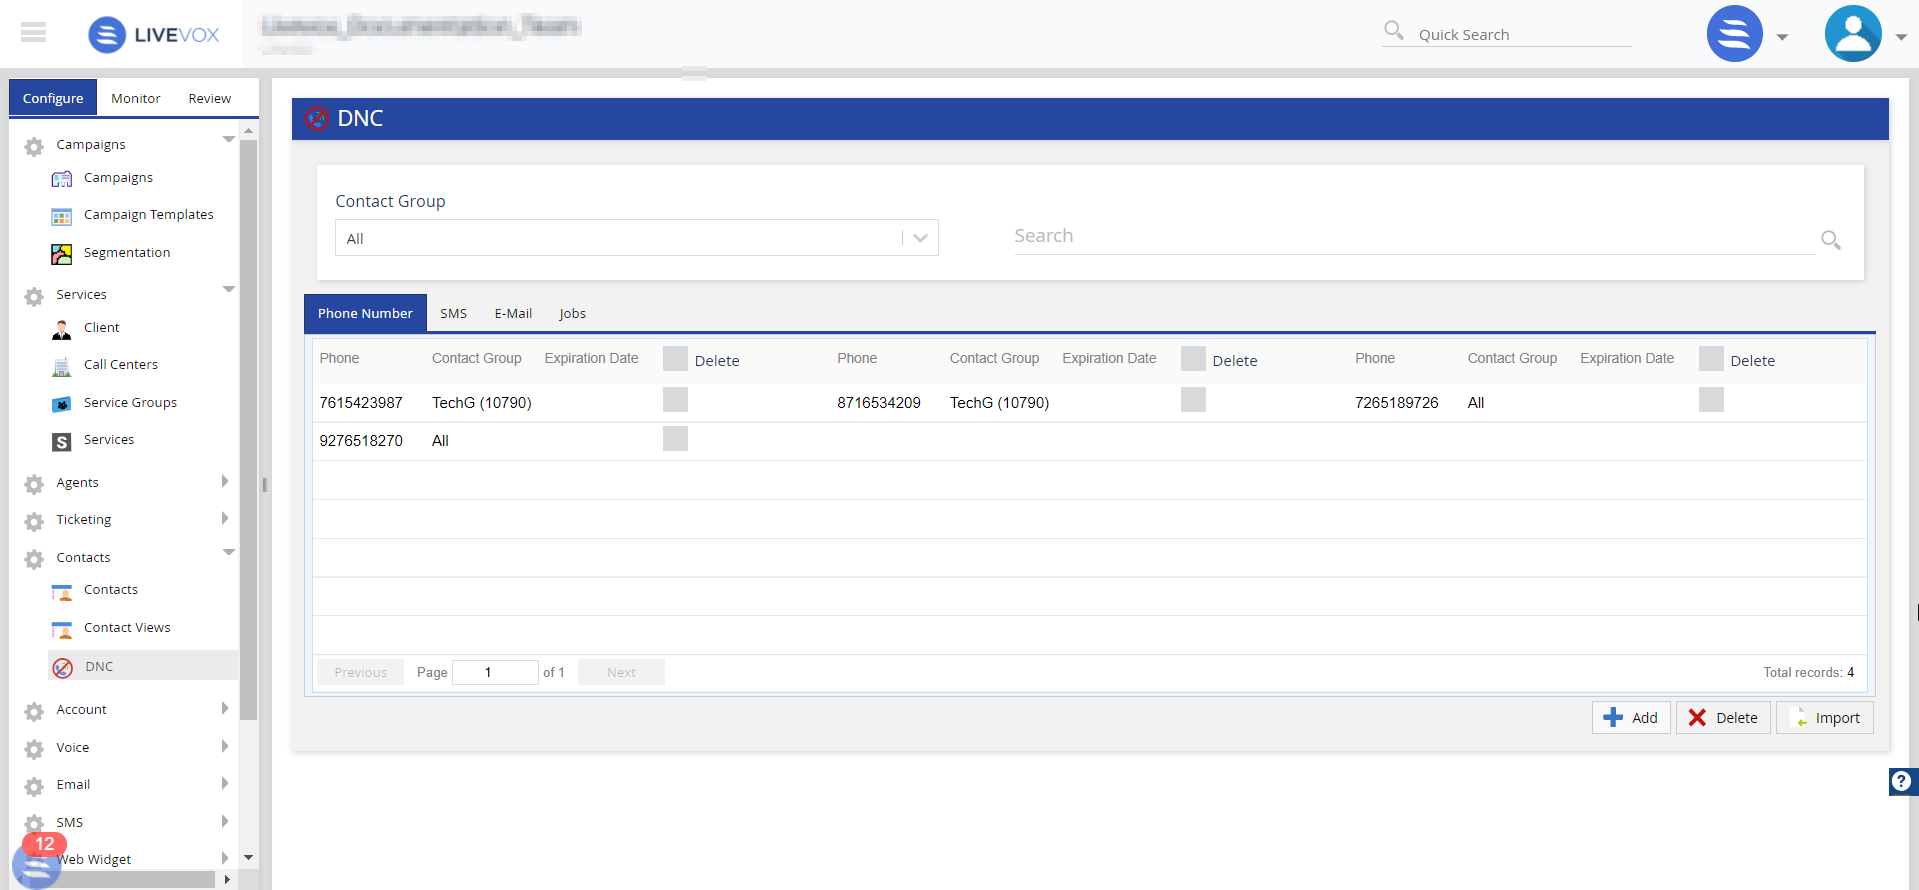
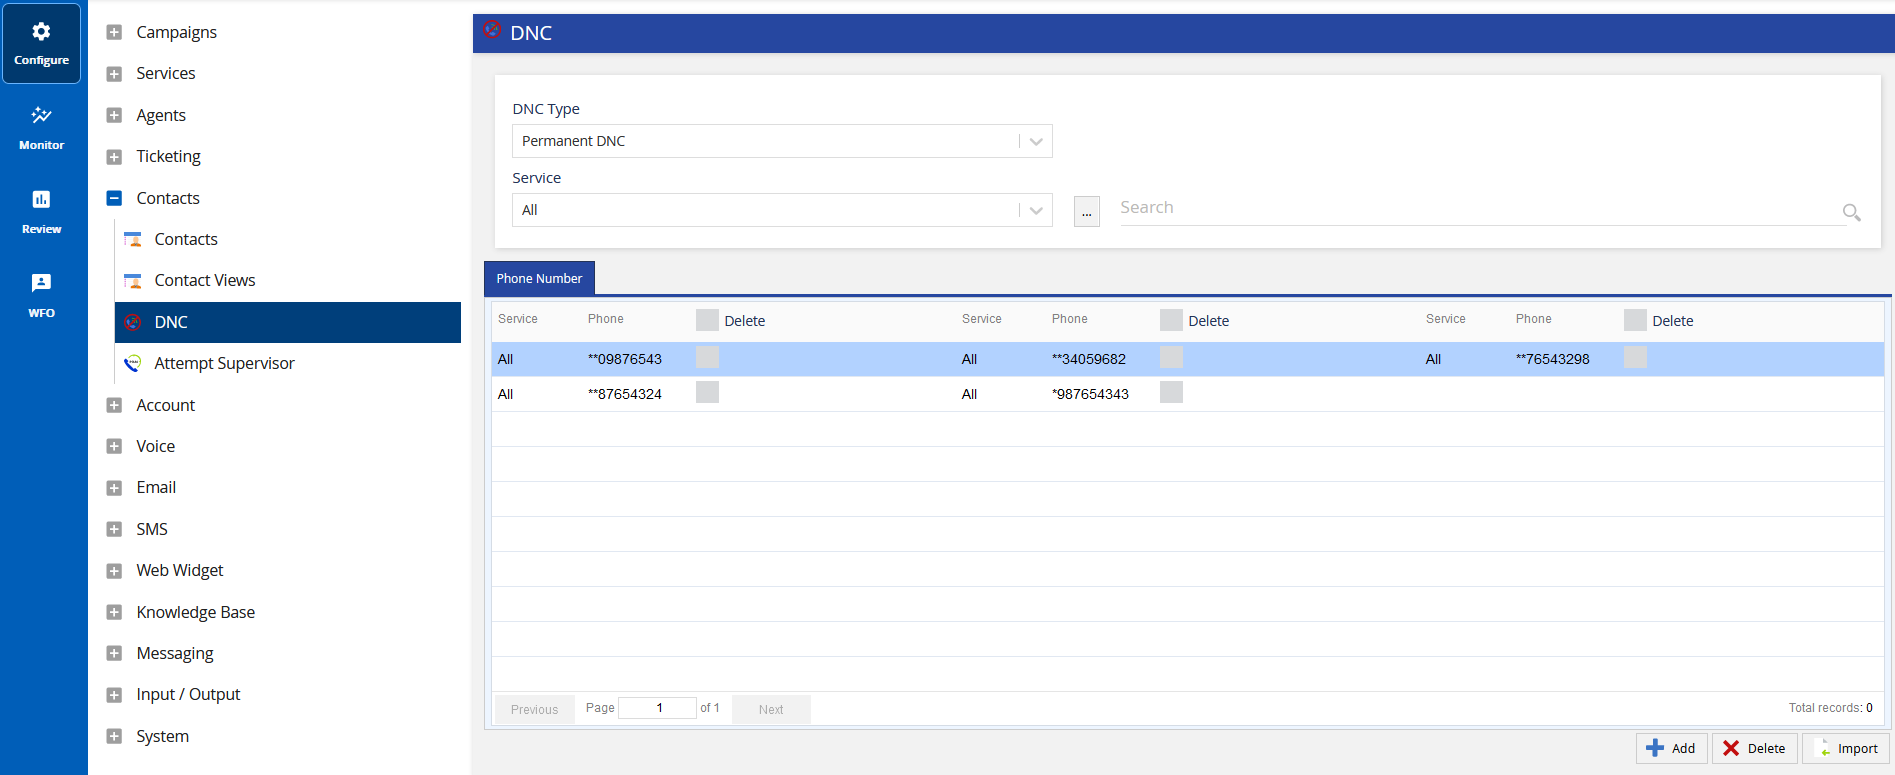
Accessing the DNC List Configuration
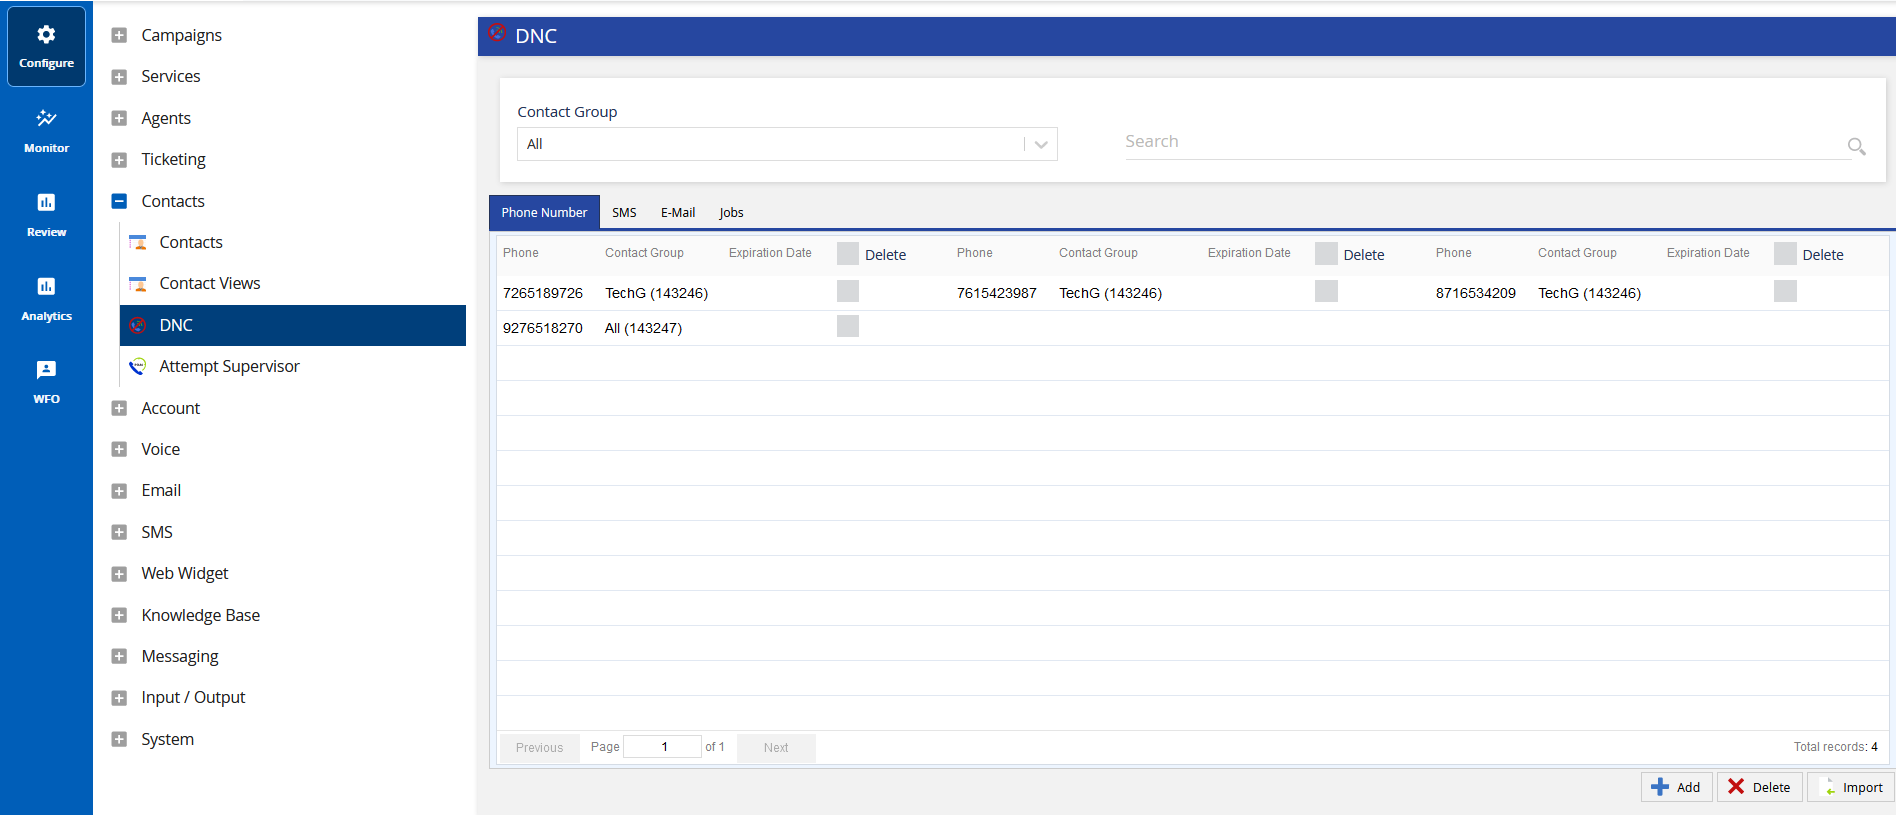
To access the DNC configuration window and add phone numbers and email addresses to the DNC list, on the Configure tab of the LiveVox Portal, click Contacts > DNC.
Configuring DNC Lists
Legacy DNC
A Legacy DNC list provides a Daily Account, Permanent Account, Daily Phone, and Permanent Phone DNC configuration that ensures entries are scrubbed when you are building a campaign.
The uploaded campaigns are compared to the DNC list at the time of construction. Entries that are added manually to a DNC list post-build are compared to phone/account numbers that have yet to be dialed using the Active Scrub feature, which is enabled for all clients. The build-time DNC check occurs at the time of a campaign build, that is, when you click the wrench icon or the Build button after you have uploaded a campaign.
By default, LiveVox DNC entries added to a permanent or daily list are phone numbers or account numbers.
You can add DNC entries using one of the following methods:
Legacy DNC Configuration Window
In the DNC configuration window, select one of the following three options.

Individual DNC Entries
To enter a new DNC entry to either the Permanent or Daily DNC lists:
- Log in to the LiveVox Portal (LVP).
- On the Configure tab, click Contacts > DNC.
- From the DNC Type drop-down list, select the DNC type.
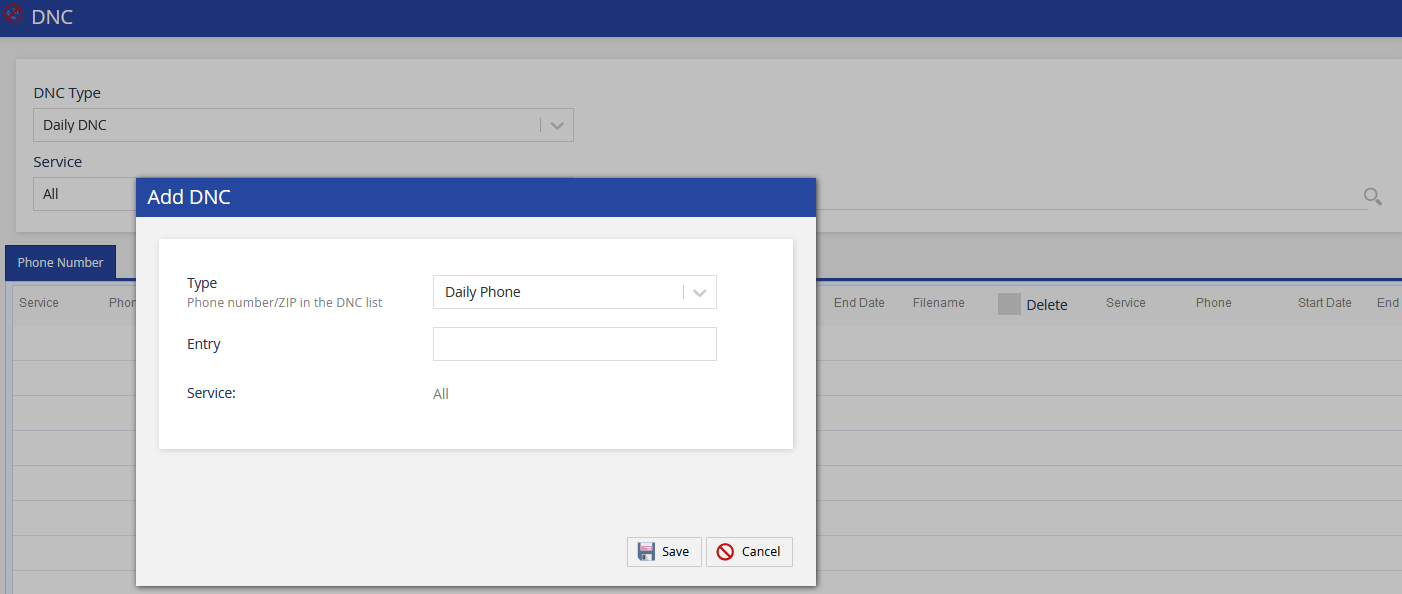
- Click Add DNC.
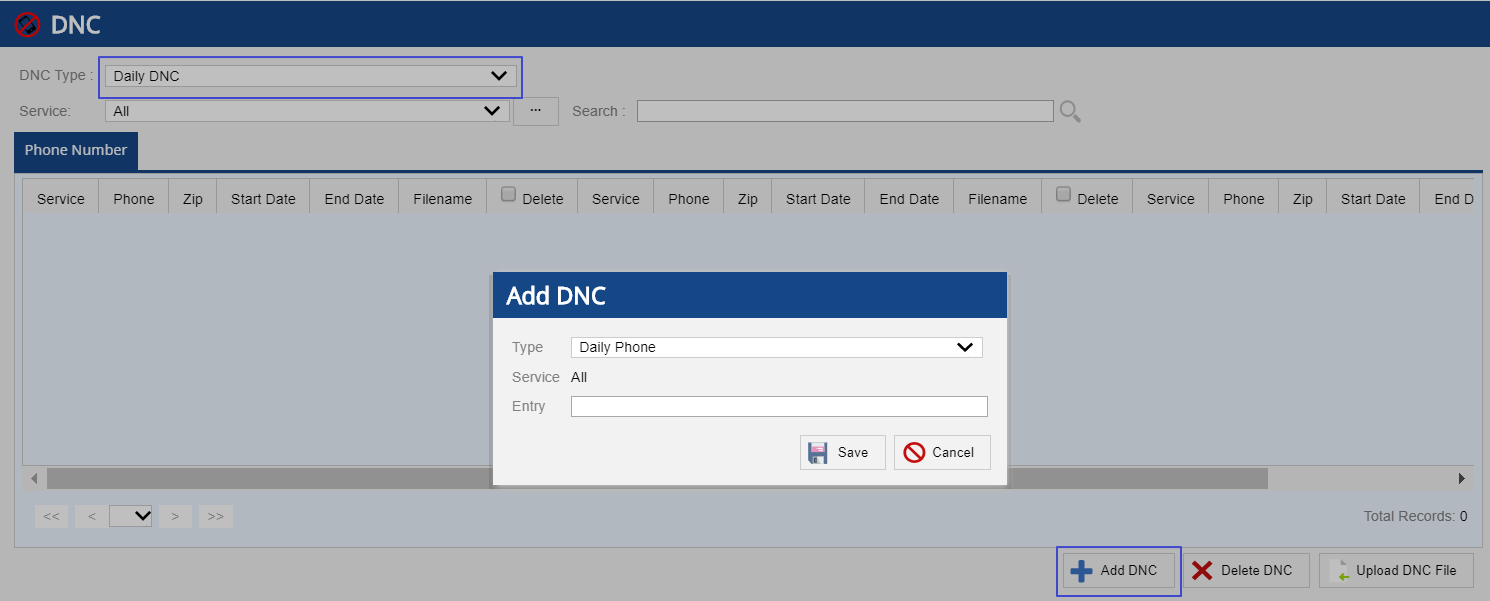
- Add the new DNC entry in the popup window that appears.
You can use the asterisk (*) as a wildcard when adding account or phone DNC entries to represent any character. For example, an entry of 123* blocks all phone numbers with the 123 area code. - Click Save.
Service-Based DNC List
A service-based DNC is enabled by default for daily DNC entries. To enable this option for other DNC categories, contact the LiveVox Customer Care team.
To make the DNC entry service-specific:
- On the Configure tab, click Contacts > DNC.
- From the DNC Type drop-down list, select the DNC type.
- From the Services drop-down list, select <multiple services>.
- Click Add DNC.
The Add DNC popup window appears.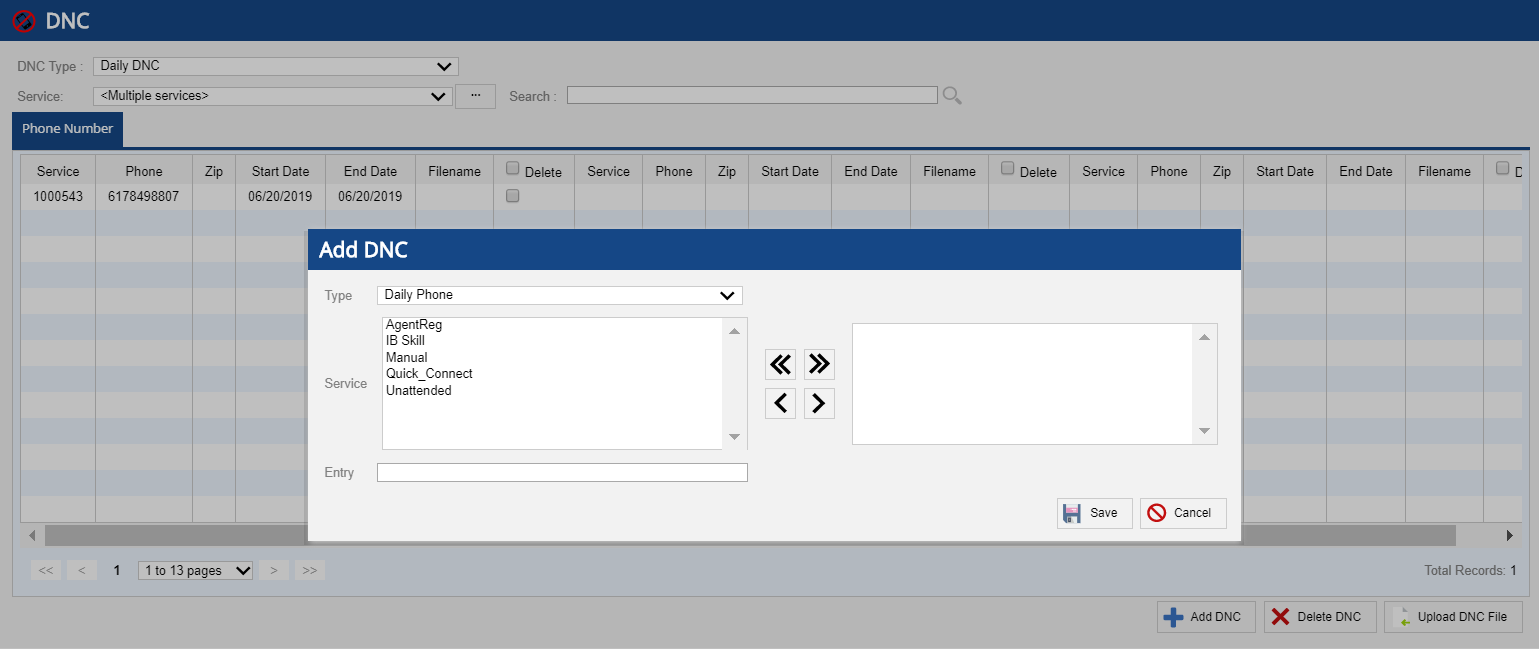
- From the Services field on the left side, select the required services and then click the right arrow to move them to the selected entries' field on the right side.
- In the Entry field, add the new DNC entry.
- Click Save.
File Upload
To upload a new DNC list file to either the Permanent or Daily DNC lists:
- On the Configure tab, click Contacts > DNC.
- From the DNC Type drop-down list, select the DNC type.
- Click Upload DNC File.
The Upload DNC window appears.
- Click the File field.
The local directory window opens. - Select the file to upload.
- From the Type drop-down list, select the DNC type.
- Click Import.
The DNC upload task is added to the user tasks queue. You can view these tasks by selecting the User Tasks option from the User drop-down list.
DeleteFTP/SFTP File Upload (Optional)
To configure this optional feature, contact the Customer Care team.
When configuring the DNC list, you can add phone numbers and/or account numbers through FTP/SFTP files. You can specify whether the phone, account number, or both should be added to the DNC list. If you specify only the account number, it can be added to the DND list (client level only) for a dial time vs. build time check.
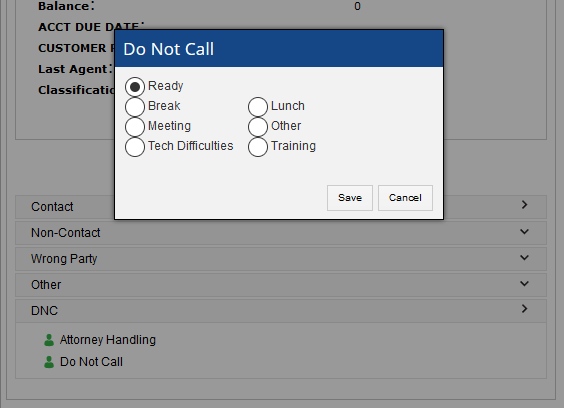
DeleteCall Disposition (Optional)
To enable the Call Disposition feature (optional), contact the Customer Care team.
The Customer Care team can help you add phone numbers and/or account numbers to the DNC list and associate them with termination codes. This feature enables your agents to automatically add phone numbers to the DNC list when the agents select the specified termination codes. You can also set the expiration dates.

Dial-Time Phone DNC
The Dial-Time Phone DNC provides a DNC configuration tool with contact group mapping and expiration dates to ensure that these entries are not dialed, sent an SMS, or emailed during dial/SMS/email time. The check occurs at the time of dialing/SMSing/emailing instead of build time, which means you do not need to rebuild or re-queue the campaign.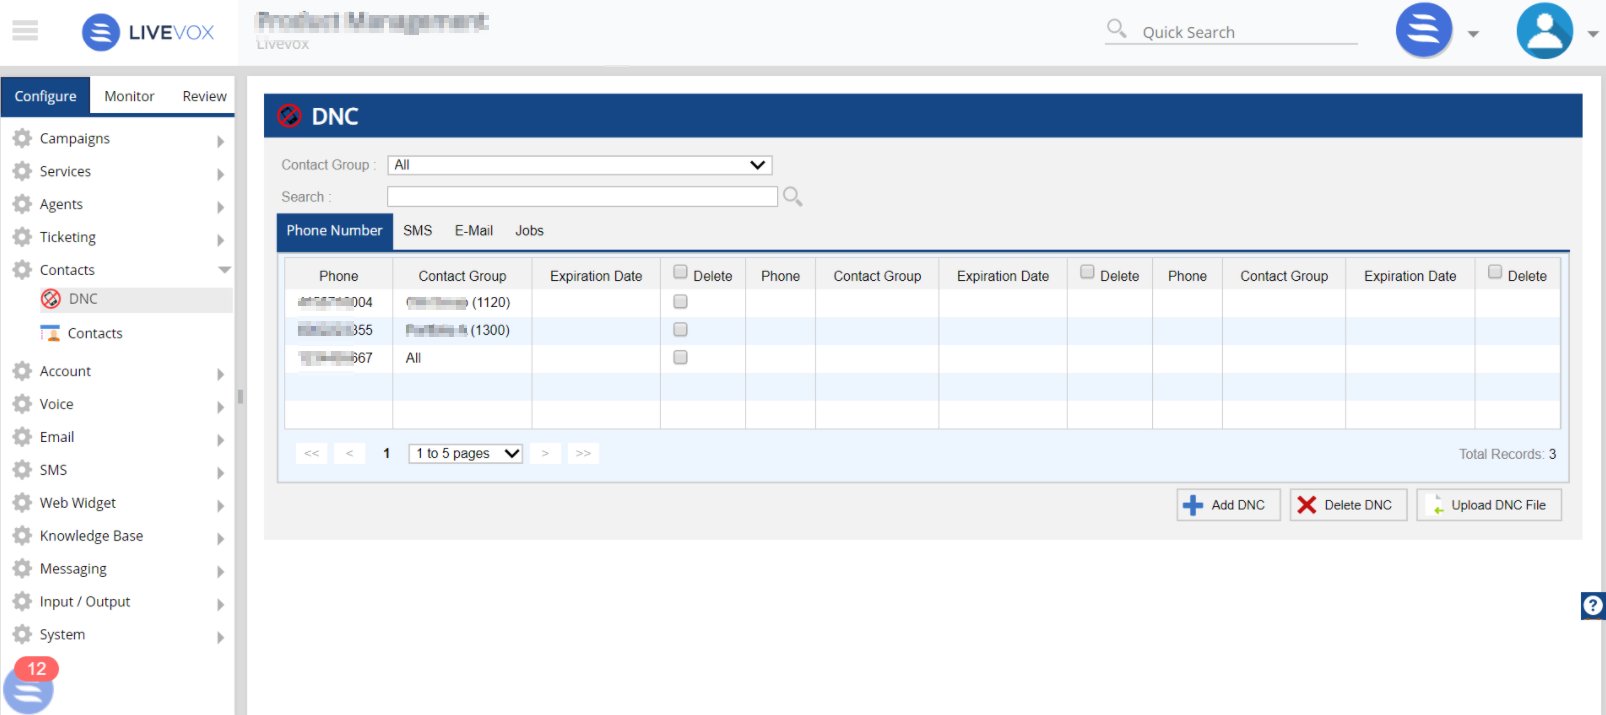
If a phone number does not have an associated contact group, the number is restricted to dial time, regardless of the DNC Contact Group mapping in the Services configuration.
Dial-Time Phone DNC offers contact restrictions at the following levels:
- Contact
- Account (Daily or Permanent)
- Account + Phone (Daily or Permanent)
- Account + Phone + SMS Consent
- Account + Phone + Cell Consent
- Account + Email Consent
You can add DNC entries by using one of the following methods:
Dial-Time Phone DNC - Individual DNC Entries
To add a new DNC entry to the Contact Group:
- Log in to the LiveVox Portal.
- On the Configure tab, click Contacts > DNC.
- Click the Phone Number, SMS, or E-Mail tab for which you want to add the DNC entry.
- Click Add.
The Add DNC window appears.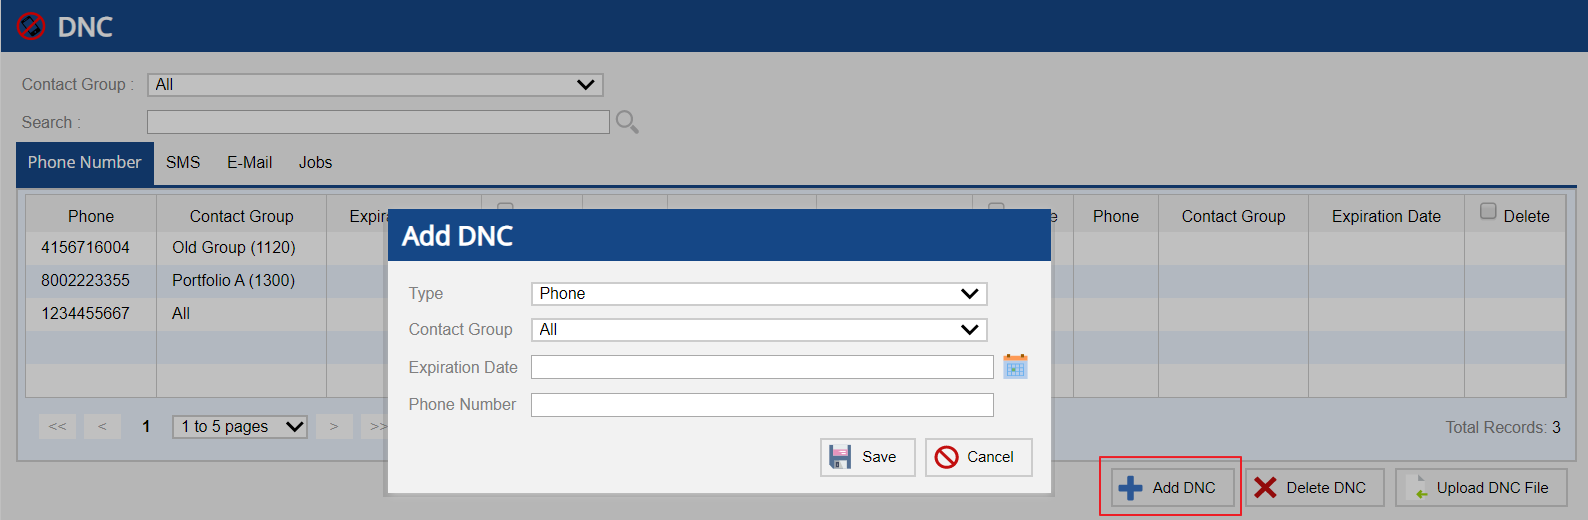
- From the Type drop-down list, select the DNC type.
- Specify the phone number or email address.
- In the Expiration Date field, enter the date on which you want the DNC entry to be removed. Alternatively, you can click the calendar icon and select the date.
- From the Contact Group drop-down list, select the contact group so that a phone number or email address (may be available in different portfolios) is restricted to the specified contact group with which it is associated.
- Click Save.
File Upload
To upload a new DNC file:
- On the Configure tab, click Contacts > DNC.
- Click the Phone Number, SMS, or E-Mail tab for which you want to add the DNC entry.
- Click Upload DNC File.
The Upload DNC window appears.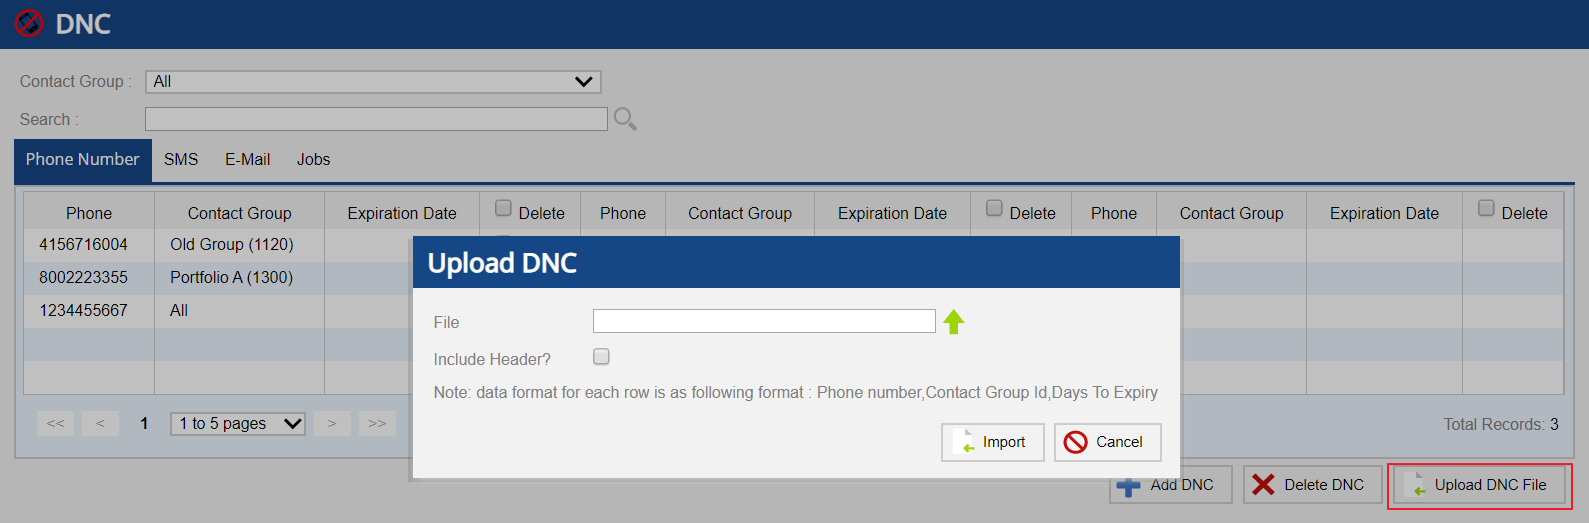
- Click the File field.
The local directory window opens. - Select the file to upload.
- Select the file format. The default file format is .csv.
- If the DNC file contains a header row, click the IncludeHeader? checkbox.
- Click Import.
The DNC upload task is added to the user tasks queue. You can view these tasks by selecting the User Tasks option from the User drop-down list.
DeleteFTP/SFTP File Upload (Optional)
To configure this optional feature, contact the Customer Care team.
When configuring the DNC list, you can add phone numbers and/or account numbers through FTP/SFTP files. You can specify whether the phone, account number, or both should be added to the DNC list. If you specify only the account number, it can be added to the DND list (client level only) for a dial time vs. build time check.
DeleteCall Disposition (Optional)
To configure this optional feature, contact the Customer Care team.
The Customer Care team can help you add phone numbers and/or account numbers to the DNC list and associate them with termination codes. This feature enables your agents to automatically add phone numbers to the DNC list when the agents select the specified termination codes. You can also set expiration dates.

LV19
DNC Types
LiveVox uses one of the following methods to run the Do-Not-Call list at the time of contacting a number or launching a campaign.
| Legacy DNC (build-time) |
|
| Dial-time DNC (dial-time) |
|
Verifying the Type of DNC for your Portal
To verify the type of DNC option that is enabled for your portal, on the Configure tab of the LiveVox Portal, click Service > Client > Settings > Advanced Features.
Accessing the DNC List Configuration
To access the DNC configuration window and add phone numbers and email addresses to the DNC list, on the Configure tab of the LiveVox Portal, click Contacts > DNC.
Configuring DNC Lists
Legacy DNC
A Legacy DNC list provides a Daily Account, Permanent Account, Daily Phone, and Permanent Phone DNC configuration that ensures entries are scrubbed when you are building a campaign.
The uploaded campaigns are compared to the DNC list at the time of construction. Entries that are added manually to a DNC list post-build are compared to phone/account numbers that have yet to be dialed using the Active Scrub feature, which is enabled for all clients. The build-time DNC check occurs at the time of a campaign build, that is, when you click the wrench icon or the Build button after you have uploaded a campaign.
By default, LiveVox DNC entries added to a permanent or daily list are phone numbers or account numbers.
You can add DNC entries using one of the following methods:
Legacy DNC Configuration Window
In the DNC configuration window, select one of the following three options.

Individual DNC Entries
To enter a new DNC entry to either the Permanent or Daily DNC lists:
- Log in to the portal.
- On the Configure tab, click Contacts > DNC.
- From the DNC Type drop-down list, select the DNC type.
- Click Add DNC.
- Add the new DNC entry in the popup window that appears.
You can use the asterisk (*) as a wildcard when adding account or phone DNC entries to represent any character. For example, an entry of 123* blocks all phone numbers with the 123 area code.
Click Save.
Service-Based DNC List
A service-based DNC is enabled by default for daily DNC entries. To enable this option for other DNC categories, contact the LiveVox Customer Care team.
To make the DNC entry service-specific:
- On the Configure tab, click Contacts > DNC.
- From the DNC Type drop-down list, select the DNC type.
- From the Services drop-down list, select <multiple services>.
- Click Add DNC.
The Add DNC window appears.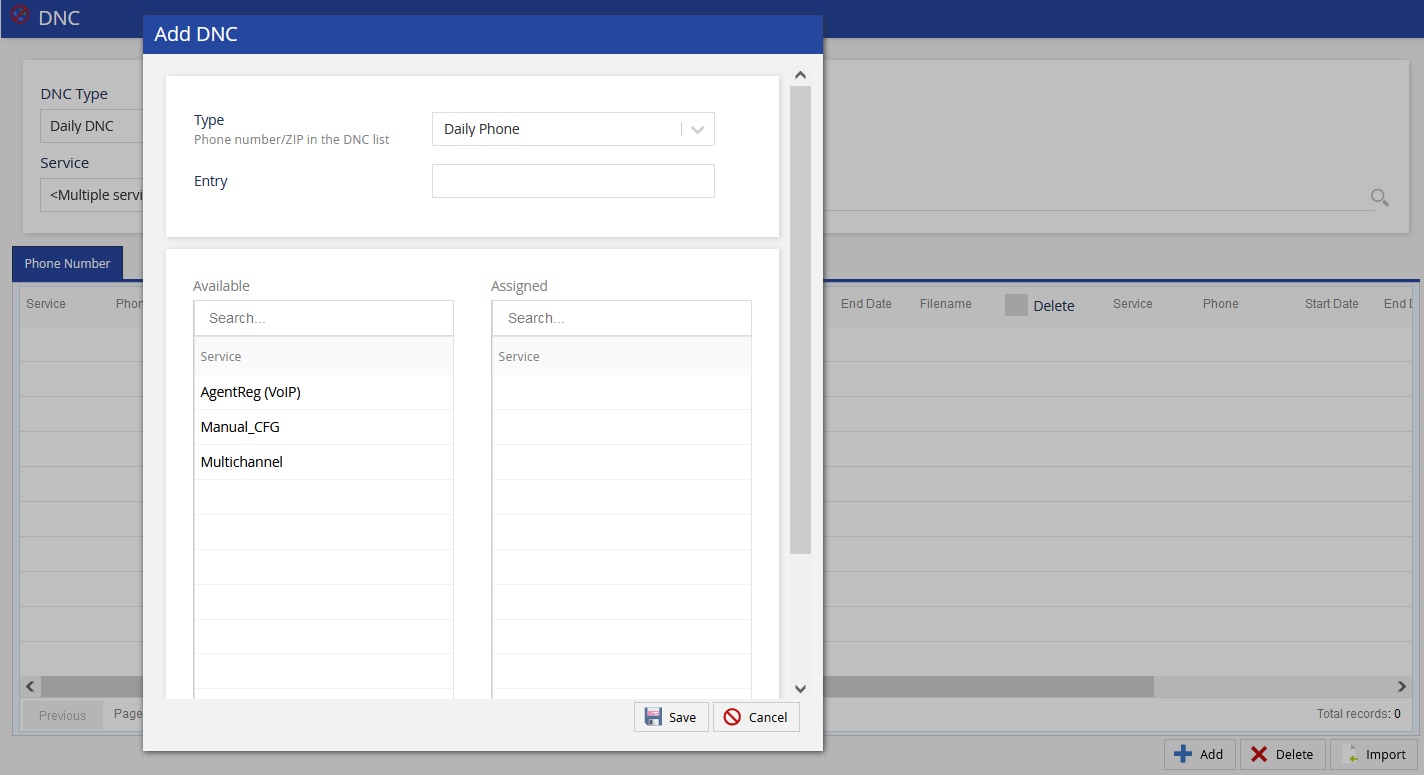
- In the Entry field, add the new DNC entry.
- From the Available column on the left side, double-click a service to move the service to the Assigned column on the right side.
- Click Save.
File Upload
To upload a new DNC list file to either the Permanent or Daily DNC lists:
- On the Configure tab, click Contacts > DNC.
- From the DNC Type drop-down list, select the DNC type.
- Click Import.
The Upload DNC window appears.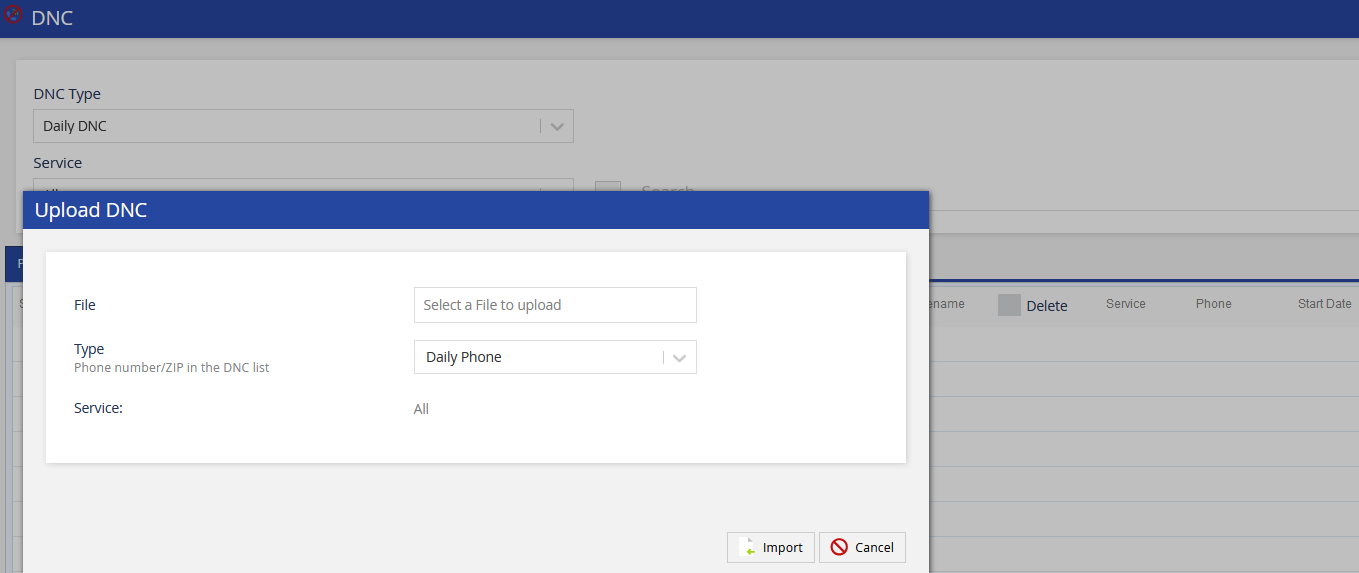
- Click the File field.
The local directory window opens. - Select the file to upload.
- From the Type drop-down list, select the DNC type.
Click Import.
The DNC upload task is added to the user tasks queue. You can view these tasks by selecting the User Tasks option from the User drop-down list.
FTP/SFTP File Upload (Optional)
To configure this optional feature, contact the Customer Care team.
When configuring the DNC list, you can add phone numbers and/or account numbers through FTP/SFTP files. You can specify whether the phone, account number, or both should be added to the DNC list. If you specify only the account number, it can be added to the DND list (client level only) for a dial time vs. build time check.
DeleteCall Disposition (Optional)
To configure this optional feature, contact the Customer Care team.
The Customer Care team can help you add phone numbers and/or account numbers to the DNC list and associate them with termination codes. This feature enables your agents to automatically add phone numbers to the DNC list when the agents select the specified termination codes. You can also set expiration dates.

Dial-Time Phone DNC
The Dial-Time Phone DNC provides a DNC configuration tool with contact group mapping and expiration dates to ensure that these entries are not dialed, sent an SMS, or emailed during dial/SMS/email time. The check occurs at the time of dialing/SMSing/emailing instead of build time, which means you do not need to rebuild or re-queue the campaign.
If a phone number does not have an associated contact group, the number is restricted to dial-time, regardless of the DNC Contact Group mapping in the Services configuration.
Dial-Time Phone DNC offers contact restrictions at the following levels:
- Contact
- Account (Daily or Permanent)
- Account + Phone (Daily or Permanent)
- Account + Phone + SMS Consent
- Account + Phone + Cell Consent
- Account + Email Consent
You can add DNC entries by using one of the following methods:
Dial-Time Phone DNC Configuration Window
In the DNC configuration window, select one of the following two options:
- Adding Individual DNC Entries
- File Upload
To add a new DNC entry to the Contact Group:
- Log in to the LiveVox Portal.
- On the Configure tab, click Contacts > DNC.
- Click the Phone Number, SMS, or E-Mail tab for which you want to add the DNC entry.
- Click Add.
The Add DNC popup window appears.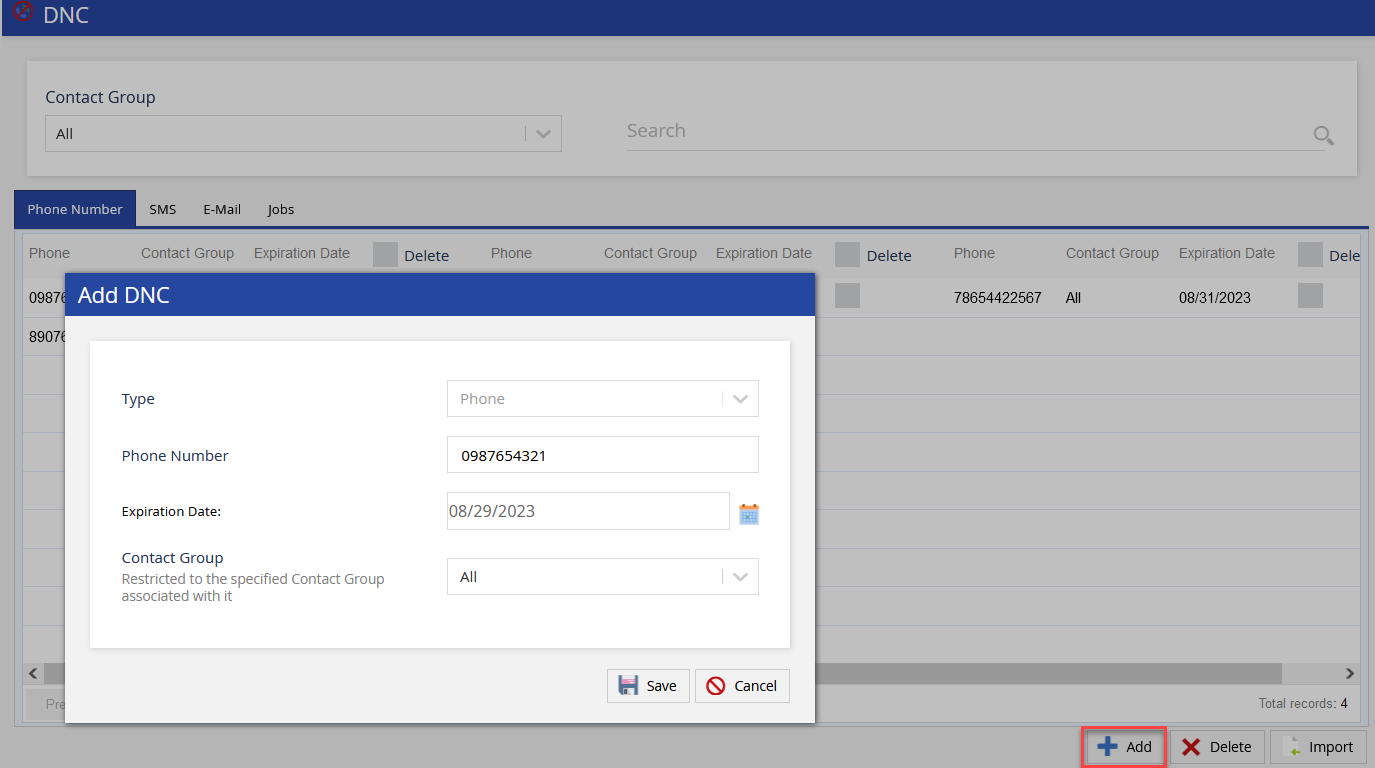
- Based on the type of DNC you want to add, click the Phone Number, SMS, or E-Mail tab.
- Specify the phone number or email address.
- In the Expiration Date field, enter the date on which you want the DNC entry to be removed. Alternatively, you can click on the calendar icon and select the date.
- From the Contact Group drop-down list, select the contact group so that a phone number or email address (may be available in different portfolios) is restricted to the specified contact group with which it is associated.
- Click Save.
File Upload
To upload a new DNC file:
- On the Configure tab, click Contacts > DNC.
- Based on the type of DNC you want to add, click the Phone Number, SMS, or E-Mail tab.
Click Import.
The Upload DNC window appears.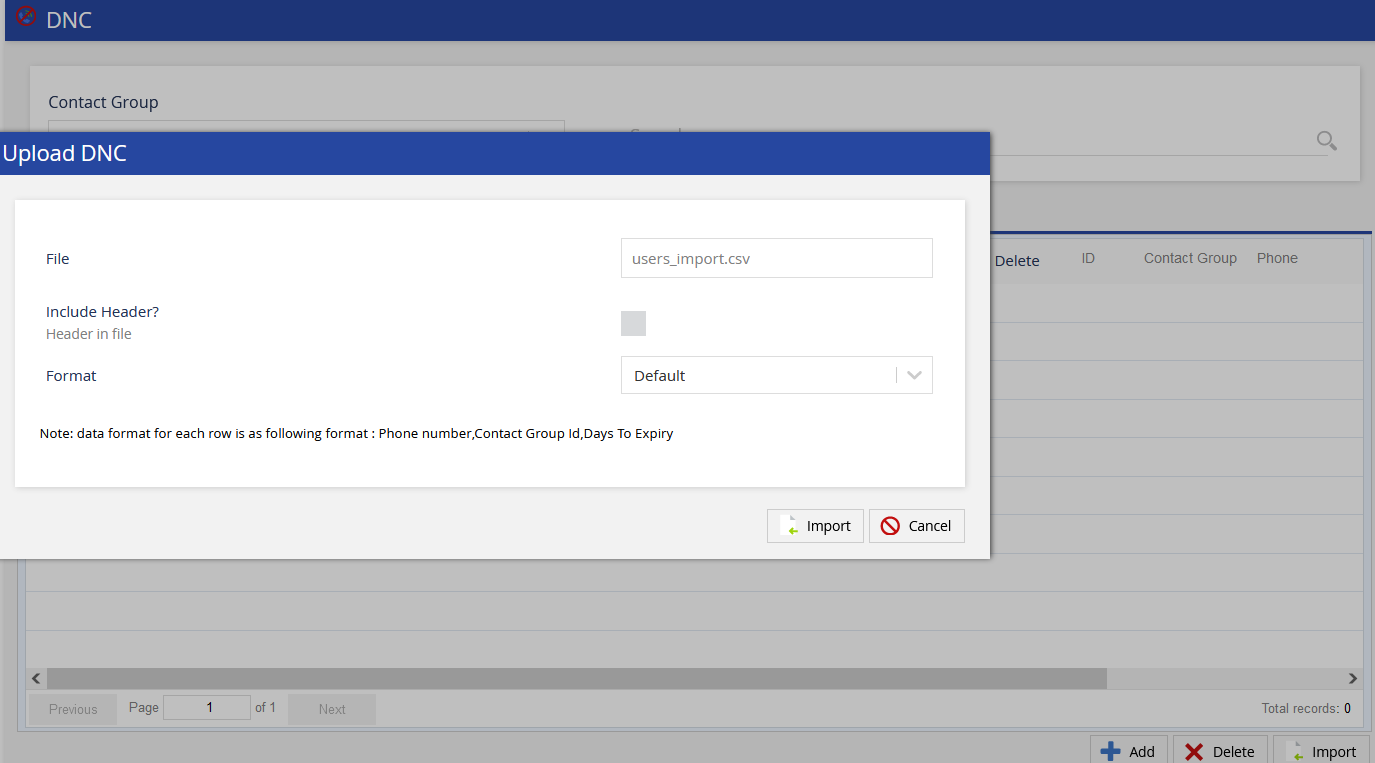
Click the File field.
The local directory window opens.Select the file to upload.
Select the file format. The default file format is .csv.
If the DNC file contains a header row, click the IncludeHeader? checkbox.
Click Import.
The DNC upload task is added to the user tasks queue. You can view these tasks by selecting the User Tasks option from the User drop-down list.
FTP/SFTP File Upload (Optional)
To configure this optional feature, contact the Customer Care team.
When configuring the DNC list, you can add phone numbers and/or account numbers through FTP/SFTP files. You can specify whether the phone, account number, or both should be added to the DNC list. If you specify only the account number, it can be added to the DND list (client level only) for a dial time vs. build time check.
DeleteCall Disposition (Optional)
To configure this optional feature, contact the Customer Care team.
The Customer Care team can help you add phone numbers and/or account numbers to the DNC list and associate them with termination codes. This feature enables your agents to automatically add phone numbers to the DNC list when the agents select the specified termination codes. You can also set expiration dates.
Fall24
DNC Type
SmartReach uses the following method to run the Do-Not-Call list at the time of contacting a number or launching a campaign.
| Dial-time DNC (dial-time) |
|
Accessing the DNC List Configuration
To access the DNC configuration window and add phone numbers and email addresses to the DNC list, on the Config tab of the SmartReach Portal, click Contacts > DNC.

Configuring DNC Lists
Dial-Time Phone DNC
The Dial-Time Phone DNC provides a DNC configuration tool with contact group mapping and expiration dates to ensure that these entries are not dialed, sent an SMS, or emailed during dial/SMS/email time. The check occurs at the time of dialing/SMSing/emailing instead of build time, which means you do not need to rebuild or re-queue the campaign.
If a phone number does not have an associated contact group, the number is restricted to dial-time, regardless of the DNC Contact Group mapping in the Services configuration.
Dial-Time Phone DNC offers contact restrictions at the following levels:
- Contact
- Account (Daily or Permanent)
- Account + Phone (Daily or Permanent)
- Account + Phone + SMS Consent
- Account + Phone + Cell Consent
- Account + Email Consent
You can add DNC entries by using one of the following methods:
Dial-Time Phone DNC Configuration Window
In the DNC configuration window, select one of the following two options:
- Adding Individual DNC Entries
- File Upload
To add a new DNC entry to the Contact Group:
- Log in to the SmartReach Portal.
- On the Config tab, click Contacts > DNC.
- Click the Phone Number, SMS, or E-Mail tab for which you want to add the DNC entry.
- Click Add.
The Add DNC popup window appears.
- Based on the type of DNC you want to add, click the Phone Number, SMS, or E-Mail tab.
- Specify the phone number or email address.
- In the Expiration Date field, enter the date on which you want the DNC entry to be removed. Alternatively, you can click on the calendar icon and select the date.
- From the Contact Group drop-down list, select the contact group so that a phone number or email address (may be available in different portfolios) is restricted to the specified contact group with which it is associated.
- Click Save.
File Upload
To upload a new DNC file:
- On the Config tab, click Contacts > DNC.
- Based on the type of DNC you want to add, click the Phone Number, SMS, or E-Mail tab.
Click Import.
The Upload DNC window appears.
- Click Select File.
The local directory window opens. - Select the file to upload.
- Select the file format. The default file format is .csv.
- If the DNC file contains a header row, click the IncludeHeader? checkbox.
- Click Import.
FTP/SFTP File Upload (Optional)
To configure this optional feature, contact the Customer Care team.
When configuring the DNC list, you can add phone numbers and/or account numbers through FTP/SFTP files. You can specify whether the phone, account number, or both should be added to the DNC list. If you specify only the account number, it can be added to the DND list (client level only) for a dial time vs. build time check.
DeleteCall Disposition (Optional)
To configure this optional feature, contact the Customer Care team.
The Customer Care team can help you add phone numbers and/or account numbers to the DNC list and associate them with termination codes. This feature enables your agents to automatically add phone numbers to the DNC list when the agents select the specified termination codes. You can also set expiration dates.