
The Agent Scheduling feature enables you to create shifts for agents, assign shifts to agents, and define thresholds for compliance. For example, if you expect your agents to comply with scheduled tasks 85% of the time, you can set 85% as the threshold.
Scheduling agents involves the following tasks:
- Configuring the Agent Scheduler settings
- Creating shifts
- Assigning shifts
Configuring Agent Scheduler Settings
You use the Agent Scheduler settings to define the work schedule for agents, approval workflows for requests sent by agents, and thresholds for compliance. Depending on the settings, agents can perform the following actions on the agent desktop:
- View their work calendar
- Request leave
- Request swapping of shifts
For information about configuring the scheduler settings, see Agent Scheduler Settings.
Creating Shifts
You can create and assign shifts to agents to run an efficient call center. Creating shifts involves specifying a shift start date, end date, start time, end time, break duration, and so on.
To create a shift for an agent:
- Log in to the LiveVox Portal (LVP) as a Sysadmin or Superuser.
- Go to Configure > Agents > Agent Scheduling. You can also navigate from WFO > Workforce Management > Agent Scheduling.
- Click the New button at the top-left corner of the Schedules tab.
Specify the shift name. - Enter a description in the Create Shift window. Click Save.
The shift is created and a new shift window appears.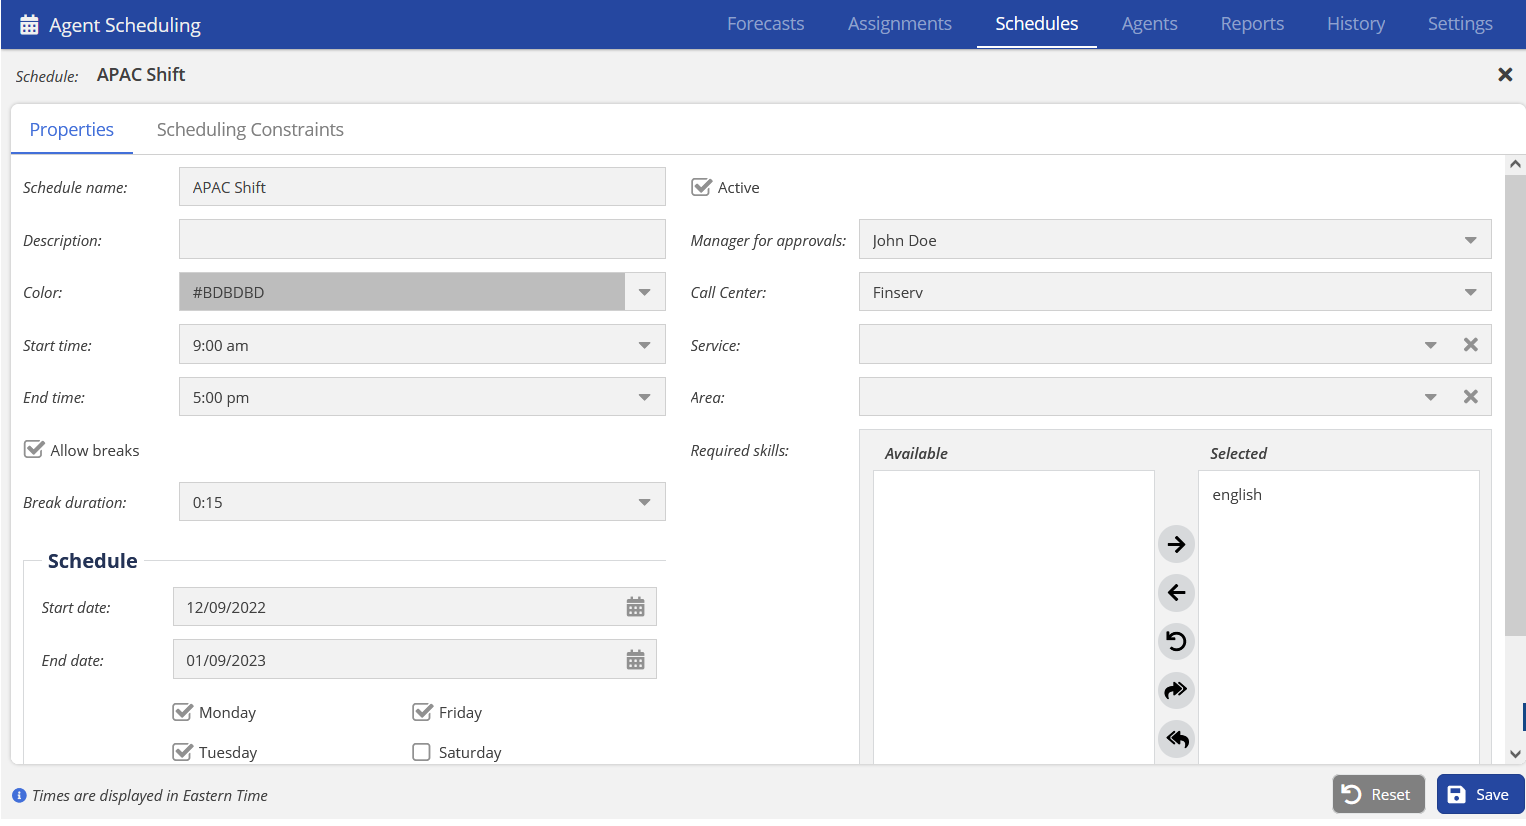
- Verify the shift name in the Schedule name window.
- Verify the description of the shift.
- Select the Manager for approvals from the drop-down menu to approve tasks for the shift.
- (Optional). Assign a color to the shift to distinguish between multiple shifts.
- Select the Call Center from the drop-down menu to associate the shift to a specific call center.
- Select the Service from the drop-down menu to associate the shift to a specific service.
- Select the work area for the shift in the Area field. You can select the area that you created on the Config tab.
- Select a Start time for the shift.
- Select an End time for the shift.
- Select the Required skills for the shift. Select the skills from the Available column and move those skills to the Selected column.
- Select the Allow break checkbox to define the break time duration for the shift. Select the Break duration from the drop-down menu.
- Define a Schedule for the shift:
- Select the Start date and End date.
- Select specific days of the week.
Assigning Shifts
After creating the shifts, assign them to agents based on their skills. You can assign shifts from the Agents tab by using one of the following methods:
- Assigning Shifts by Drag and Drop
- Assigning Shifts in Bulk
- Assigning Shifts by Copying Across Dates
Assigning Shifts Using the Drag & Drop Option
- On the WFO tab, go to Workforce Management > Agent Scheduling. You can also access the Schedule tab from Configure > Agents > Agent Scheduling.
- Click the Schedules tab.
- From the Assign drop-down menu, click By Drag & Drop.
- Select a shift from the drop-down menu.
In the first row, the shift and the shift timings appear. - From the first row, drag the shift and drop it in the corresponding agent cell to assign the shift.

- (Optional). Select the Unscheduled Only checkbox to filter the available agents.
- You can do this for the number of slots available for the respective shift. After all the slots are filled, you cannot apply that shift to other agents
- (Optional). While assigning shifts, you can assign reasons why an agent would not be available. These reasons are called Not Ready Reasons. The following is the list of Not Ready Reasons:
- Break
- Lunch
- Meeting
- Other
- Tech Difficulties
- Training
- Click Publish to save all the changes and make the schedule available for agents and other managers.
Assigning Shifts in Bulk
By using bulk assignment, you can select multiple agents for shift assignment.
- On the WFO tab, go to Workforce Management > Agent Scheduling. You can also access the Schedule tab from Configure > Agents > Agent Scheduling.
- Click the Schedules tab.
- From the Assign drop-down menu, click In Bulk.
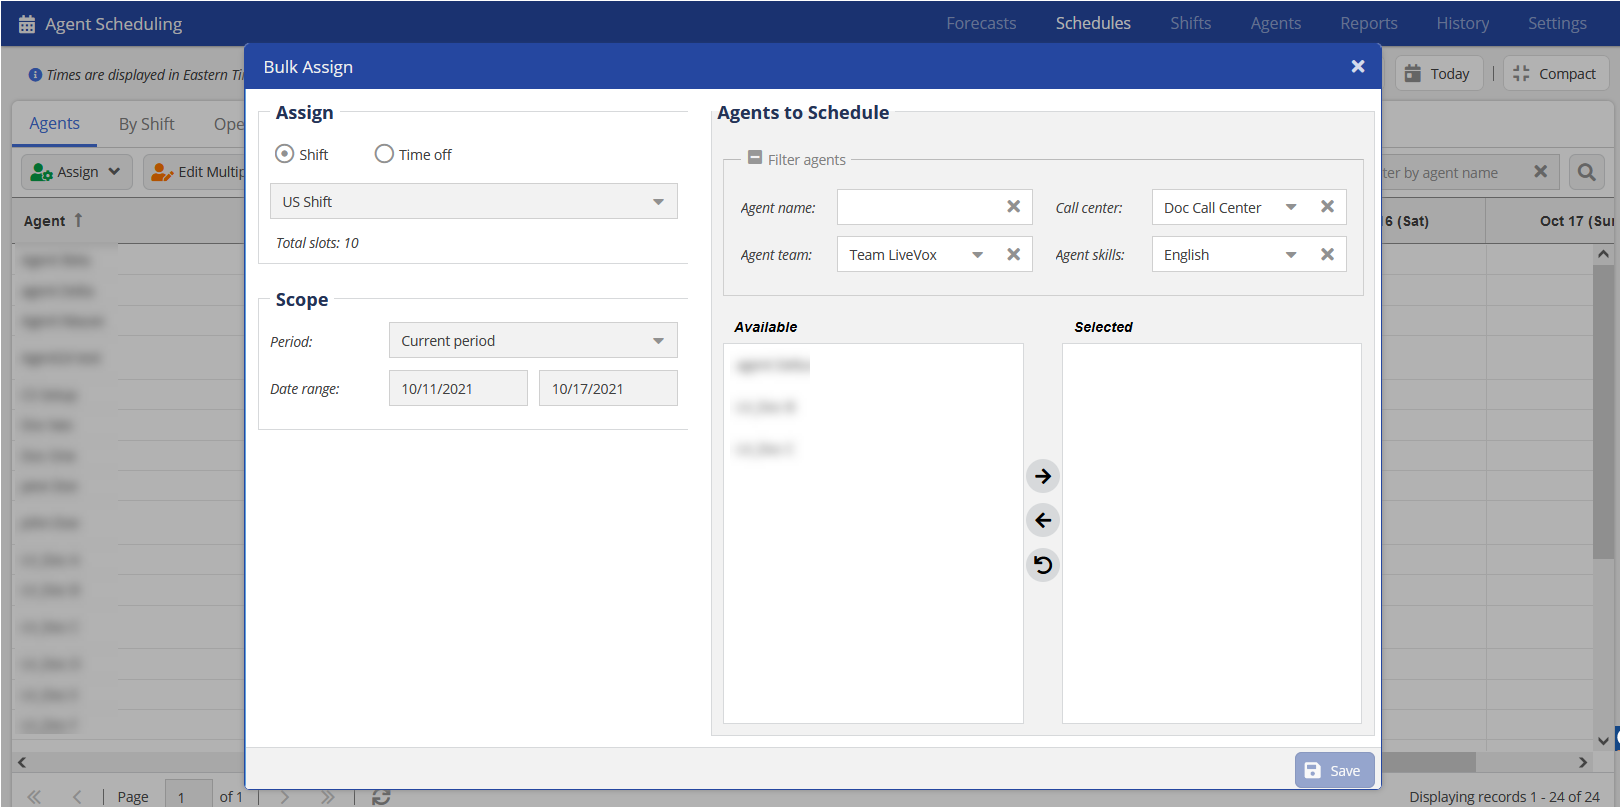
- Select the required shift for scheduling.
- Select the Scope to assign the shift to a specific time.
- You can Filter the list of available agents by:
- Agent Name
- Call Center
- Agent Team
- Agent Skills
- Select one or multiple agents (hold CTRL to select multiple) from the Available column and move them to the Selected column.
- Click Save to save the shift assignment.
- Click the Publish button to save all the changes and make the schedule available for the agents and other managers.
Assigning Shifts by Copying Across Dates
You can copy the shift assignment for a specific day or a range of days to another range of days using the Copy Assignments option. To copy shift assignment:
- On the WFO tab, go to Workforce Management > Agent Scheduling. You can also access the Schedule tab from Configure > Agents > Agent Scheduling.
- Click the Schedules tab.
- From the Assign drop-down menu, click By Copying Across Dates.

- Select Copy From and Copy To date range.
- From the Options section, select the required options.
- From the Available list, select the agents for whom you want to assign the shifts. You can also filter out the available agents from the Agents' Assignments to Copy section.
- Click the Copy button and then the Publish button.