
U17
Managing a ticket involves creating, modifying, and viewing a ticket. The Tickets subsection of the Ticketing section enables you to manage tickets, as well as accounts and contacts.
This article contains the following sections:
Creating a Ticket
You create a ticket to track a request or an issue.
To create a ticket:
- On the Configure tab, go to Ticketing > Tickets.
The Tickets tab is displayed.
Alternatively, on the Tickets menu, you can click New Ticket. - On the Tickets tab, click New.
The New Ticket window is displayed. - Specify values in the following fields, as required.Delete
Info
For information about the fields, see Ticket Fields.
- Click Save.
A message stating that the ticket has been created is displayed. The details of the ticket appear on the Tickets tab.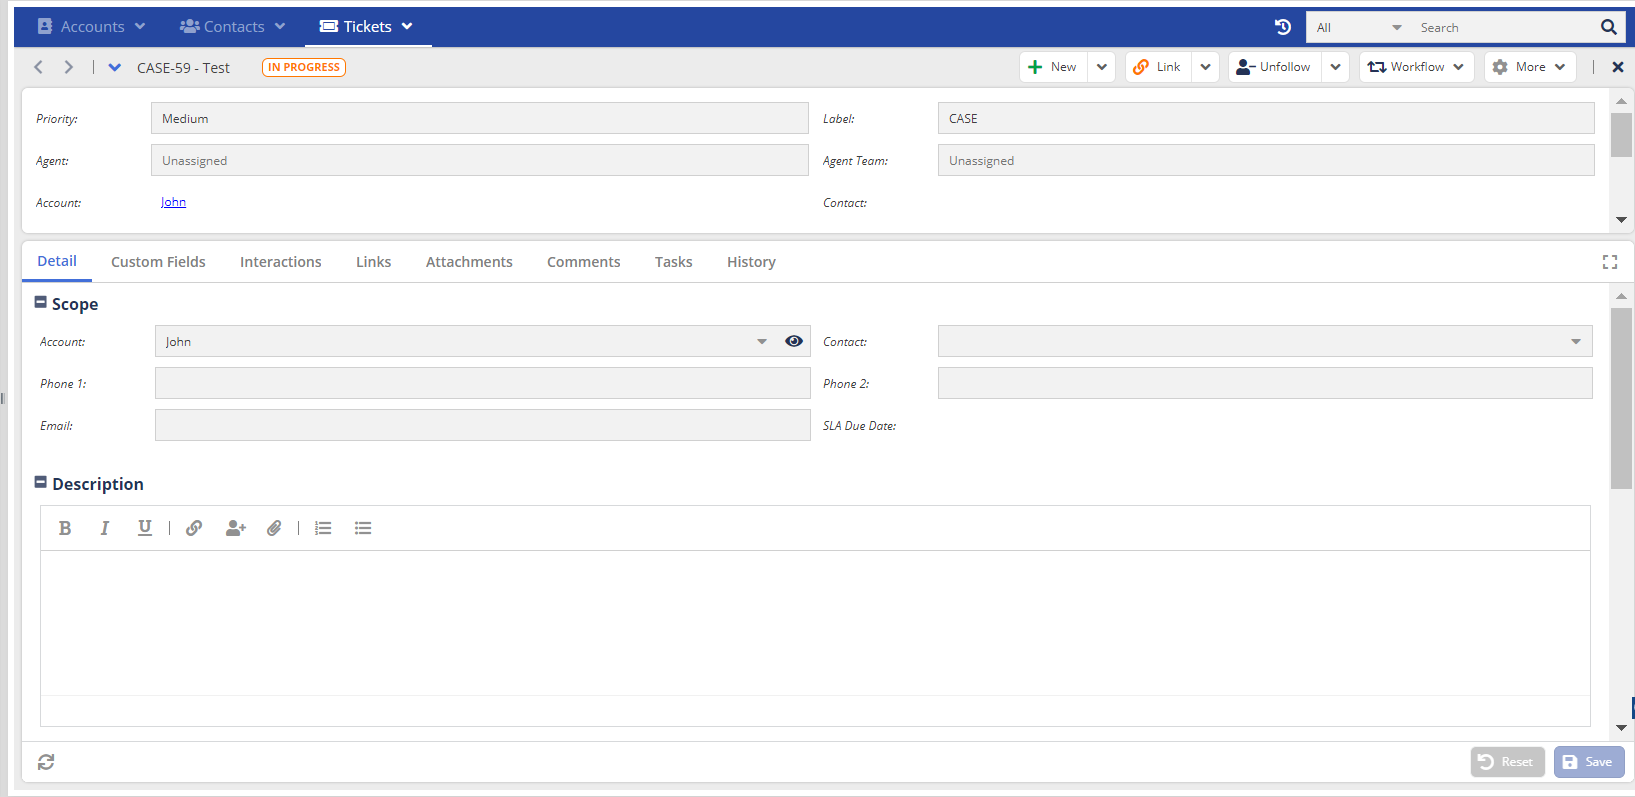
Info
When you create a ticket, the system generates an external URL to the ticket. You can include this URL in the auto email message so that external users can view a specific ticket using the ticket link without logging on to the LiveVox Portal (LVP).
Modifying a Ticket
You can modify the fields in a ticket at a later stage,
To modify a ticket:
- On the Configure tab, go to Ticketing > Tickets.
The Tickets tab appears, displaying a table with tickets that you recently viewed.DeleteInfo
- To view all tickets, in the Search box, click the Clear Ticket View icon (
 ).
). - If you have customized ticket views (ticket filters), use them to segment, track, prioritize, or manage tickets. Ticket filters are available in the Search box.
- If the Search box displays the message Select a predefined view, all tickets appear in the table.
- If, after having selected a ticket filter in the Search box, you want to view all the tickets, click the Clear Ticket View icon
 .
.
- To view all tickets, in the Search box, click the Clear Ticket View icon (
-
Double-click the row containing the ticket that you want to modify.
-
The ticket window appears, displaying the main section. The main section displays the fields that are selected in the Ticket Highlight subtab on the Screen tab of the Ticketing Config window for the same ticket type (that is, the value in the Type field of the ticket). In addition, the window displays the following tabs.
Tab Description Detail Displays fields that are selected in the Ticket Detail subtab on the Screen tab of the Ticketing Config window for the same ticket type. Custom Fields Displays fields that are selected for the ticket entity in the Field window.
Interactions Displays a table with the interactions associated with the ticket. The table displays the following columns:
- Type
- Agent
- Target
- Original Contact #
- Date
- Start
- End
- Subject
- Outcome
- Campaign
Links Displays the list of the web address and knowledge-base articles that are linked to the ticket.
Attachments Displays the attachments associated with the ticket.
Comments Displays comments associated with the ticket.
To add a comment:
- On the New menu, click the Comment option.
The New Comment window appears. - Specify your comment in the text box, format it as required, and then click Save.
- Click View Public, if you anyone to be able to view the comments.
The comment is added, and it appears on the Comments tab, along with your name and time stamp.
You can modify a comment using the Edit icon next to the comment.
You can delete a comment using the Delete icon next to the comment.
Tasks Displays all the tasks created for the ticket.
History Displays a table with all the changes made to the ticket. The table displays the following columns:
- Changed By
- Changed On
- Short Description
- Modify the values in the fields, as required.
-
Click Save.
The ticket is updated.
.png) ). In the Search window, specify values in the fields, as required, and then click Search. You can select multiple values in some of the Search fields.
). In the Search window, specify values in the fields, as required, and then click Search. You can select multiple values in some of the Search fields..png) .
..png) next to the attachment.
next to the attachment..png) ).
).Viewing Tickets
To view a list of all the tickets, on the Configure tab, go to Ticketing > Tickets, and then, in the window that is displayed, on the Tickets menu, click View Tickets List. You also can view the tickets using a ticket filter or when you modify a ticket.
Ticket Filter
The following are a few ticket filter options:

- The Recently Viewed option contains customized filters (views) that you can select to track, prioritize, or manage records. It displays the last ten records that you viewed recently.
- If you have customized ticket views (ticket filters), you can use these filters to segment, track, prioritize, or manage tickets. Ticket filters are available in the Search box. For more information on Filtering the tickets, see Filtering Accounts, Contacts, and Tickets.
- If the Search box displays the message, Select a predefined view, then all tickets appear in the table. Click the drop-down list to select a predefined ticket filter view.
Search Box Filters
The following are a few ticket filter options:
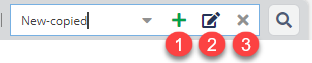
- You can create or modify a ticket filter.
- You can modify the ticket filter.
- After having selected a ticket filter in the Search box, you clear and view all tickets.
For more information on the types of ticket views, see Views.
Modifying the Tickets List Table
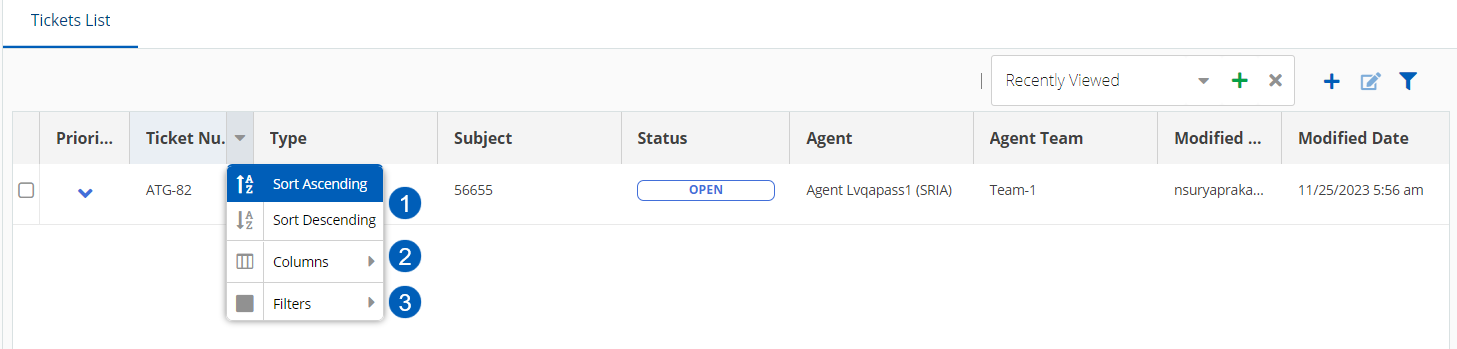
You can sort the tickets based on the following priorities: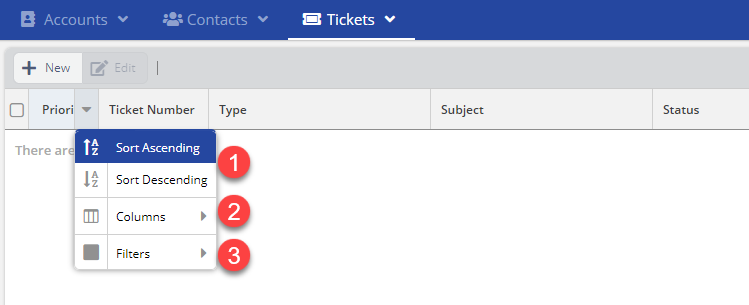
- To sort the ticket values in a column in ascending or descending order, click the column heading once or twice as required. Alternatively, you can click the arrow next to the column heading, and then select Sort Ascending or Sort Descending.
- To display only certain columns, click the arrow next to any column heading, click Columns, and then clear the checkboxes next to the columns that you do not want to be displayed in the table.
- To filter the tickets based on a column, click the arrow next to the column heading, click Filters, and then specify the text based on which you want to filter the tickets.
LV19
Managing a ticket involves creating, modifying, and viewing a ticket. The Tickets subsection of the Ticketing section enables you to manage tickets, as well as accounts and contacts.
This article contains the following sections:
Creating a Ticket
You create a ticket to track a request or an issue.
To create a ticket:
- On the Configure tab, go to Ticketing > Tickets.
The Tickets tab is displayed.
Alternatively, on the Tickets menu, you can click New Ticket. - On the Tickets tab, click New.
The New Ticket window is displayed. - Specify values in the following fields, as required.Delete
Info
For information about the fields, see Ticket Fields.
- Click Save.
A message stating that the ticket has been created is displayed. The details of the ticket appear on the Tickets tab.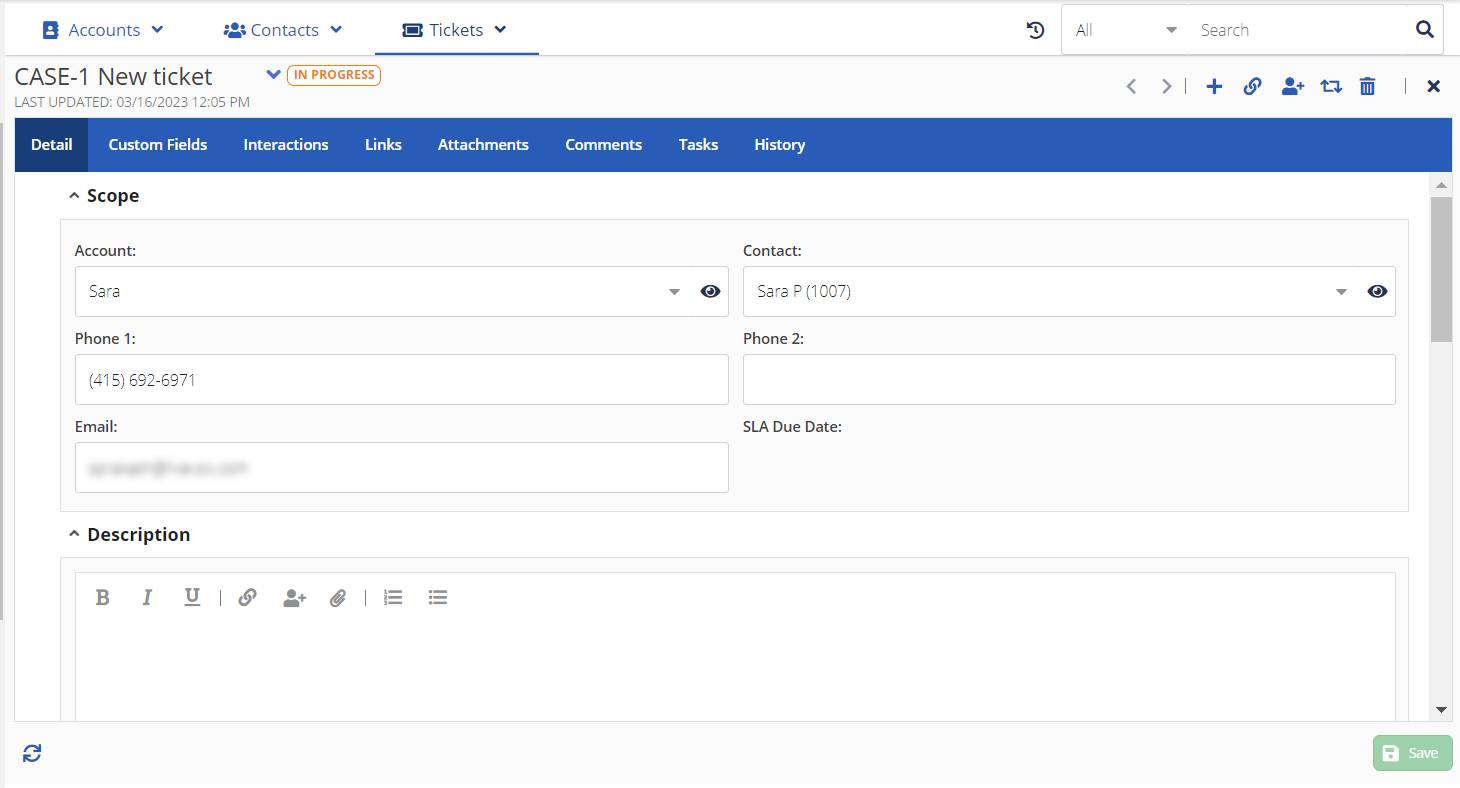
Info
When you create a ticket, the system generates an external URL to the ticket. You can include this URL in the auto email message so that external users can view a specific ticket using the ticket link without logging on to the LiveVox Portal (LVP).
Modifying a Ticket
You can modify the fields in a ticket at a later stage,
To modify a ticket:
- On the Configure tab, go to Ticketing > Tickets.
The Tickets tab appears, displaying a table with tickets that you recently viewed.DeleteInfo
- To view all tickets, in the Search box, click the Clear Ticket View icon ().
- If you have customized ticket views (ticket filters), use them to segment, track, prioritize, or manage tickets. Ticket filters are available in the Search box.
- If the Search box displays the message Select a predefined view, all tickets appear in the table.
- If, after having selected a ticket filter in the Search box, you want to view all the tickets, click the Clear Ticket View icon .
- To view all tickets, in the Search box, click the Clear Ticket View icon (
-
Double-click the row containing the ticket that you want to modify.
-
The ticket window appears, displaying the main section. The main section displays the fields that are selected in the Ticket Highlight subtab on the Screen tab of the Ticketing Config window for the same ticket type (that is, the value in the Type field of the ticket). In addition, the window displays the following tabs.
Tab Description Detail Displays fields that are selected in the Ticket Detail subtab on the Screen tab of the Ticketing Config window for the same ticket type. Custom Fields Displays fields that are selected for the ticket entity in the Field window.
Interactions Displays a table with the interactions associated with the ticket. The table displays the following columns:
- Type
- Agent
- Target
- Original Contact #
- Date
- Start
- End
- Subject
- Outcome
- Campaign
Links Displays the list of the web address and knowledge-base articles that are linked to the ticket.
Attachments Displays the attachments associated with the ticket.
Comments Displays comments associated with the ticket.
To add a comment:
- On the New menu, click the Comment option.
The New Comment window appears. - Specify your comment in the text box, format it as required, and then click Save.
- Click View Public, if you anyone to be able to view the comments.
The comment is added, and it appears on the Comments tab, along with your name and time stamp.
You can modify a comment using the Edit icon next to the comment.
You can delete a comment using the Delete icon next to the comment.
Tasks Displays all the tasks created for the ticket.
History Displays a table with all the changes made to the ticket. The table displays the following columns:
- Changed By
- Changed On
- Short Description
- Modify the values in the fields, as required.
-
Click Save.
The ticket is updated.
Viewing Tickets
To view a list of all the tickets, on the Configure tab, go to Ticketing > Tickets, and then, in the window that is displayed, on the Tickets menu, click View Tickets List. You also can view the tickets using a ticket filter or when you modify a ticket.
Ticket Filter
The following are a few ticket filter options:
- The Recently Viewed option contains customized filters (views) that you can select to track, prioritize, or manage records. It displays the last ten records that you viewed recently.
- If you have customized ticket views (ticket filters), you can use these filters to segment, track, prioritize, or manage tickets. Ticket filters are available in the Search box. For more information on Filtering the tickets, see Filtering Accounts, Contacts, and Tickets.
- If the Search box displays the message, Select a predefined view, then all tickets appear in the table. Click the drop-down list to select a predefined ticket filter view.
Search Box Filters
The following are a few ticket filter options:
- You can create or modify a ticket filter.
- You can modify the ticket filter.
- After having selected a ticket filter in the Search box, you clear and view all tickets.
For more information on the types of ticket views, see Views.
Modifying the Tickets List Table
You can sort the tickets based on the following priorities:
- To sort the ticket values in a column in ascending or descending order, click the column heading once or twice as required. Alternatively, you can click the arrow next to the column heading, and then select Sort Ascending or Sort Descending.
- To display only certain columns, click the arrow next to any column heading, click Columns, and then clear the checkboxes next to the columns that you do not want to be displayed in the table.
- To filter the tickets based on a column, click the arrow next to the column heading, click Filters, and then specify the text based on which you want to filter the tickets.
Fall 23
Managing a ticket includes tasks, such as creating, modifying and viewing tickets. The Tickets subsection within the Ticketing section allows you to manage tickets, accounts, and contacts.
This article contains the following sections:
Creating a Ticket
Create a ticket to track a request or an issue.
To create a ticket:
- On the Configure tab, go to Ticketing > Tickets.
The Tickets tab is displayed.
Alternatively, on the Tickets menu, you can click New Ticket. - On the Tickets tab, click New.
The New Ticket window is displayed. - Specify values in the Ticket Fields.
- Click Save.
The ticket is saved and the details of the ticket appear on the Tickets tab..png)
Modifying a Ticket
To modify the details of an existing ticket:
- On the Configure tab, go to Ticketing > Tickets.
The Tickets tab appears, displaying the recently viewed tickets. -
Locate and double-click the ticket that you want to modify.
The ticket window appears, displaying the main section.
The main section displays fields selected in the Ticket Highlight subtab of the Screen tab in the Ticketing Config window for the corresponding ticket type (that is, the value in the Type field of the ticket). In addition, the window presents the following tabs.
Tab Description Detail Displays fields selected in the Ticket Detail subtab on the Screen tab of the Ticketing Config window for the corresponding ticket type.
Custom Fields Displays fields selected for ticket entity in the Field window. For more information, see Field Settings.
Interactions Displays a table with the interactions associated with the ticket.
Links Displays a list of web address and knowledge-base articles linked to the ticket.
Attachments Displays attachments associated with the ticket.
Comments Displays comments associated with the ticket.
To add a comment:
- On the New menu, click the Comment option.
The New Comment window appears. - Enter the comment in the text box, and click Save.
- Select View Public if you wish to allow the comments to be visible to everyone.
The comment is added, and it appears on the Comments tab, along with your name and time stamp.
You can modify or delete a comment using the Edit icon (
 ) and Delete (
 ) icon respectively.
Tasks Displays all tasks created for the ticket.
History Displays a table with all changes made to the ticket.
- On the New menu, click the Comment option.
- Modify the values in the fields as required.
-
Click Save to save the changes.
Click Reset to revert the changes.
 ) in the Call Detail window.
 Viewing Ticket Details
To view a list of all the tickets, on the Configure tab, go to Ticketing > Tickets, and then, in the window that is displayed, on the Tickets menu, click View Tickets List.
Ticket Filter
The following are the ticket filter options:

- Create a ticket filter.
- Clear the search options.
- Create a ticket.
- Modify the ticket filter.
- Use advanced filter options to search for the ticket.
For more information on the types of ticket views, see Views.
Modifying the Tickets List Table
You can sort the tickets based on the following priorities:
- To sort the ticket values in a column in ascending or descending order, click the column heading once or twice as required. Alternatively, you can click the arrow next to the column heading, and then select Sort Ascending or Sort Descending.
- To display only certain columns, click the arrow next to any column heading, click Columns, and then clear the checkboxes next to the columns that you do not want to be displayed in the table.
- To filter the tickets based on a column, click the arrow next to the column heading, click Filters, and then specify the text based on which you want to filter the tickets.